Thursday, 19 July 2018

Leaking Water Pump Housing or Seal - replacement

The BRM does not get many outings due to noise restrictions at Australia race tracks however is started every fortnight and has occasional test day outings, which are non racing.

A recent outing identified the only issue on the car since the restoration, which was a very very small water leak from the water pump, mounted on the front of the engine.

We were not sure if it was the pump housing (an original item) or the new housing mount seals or the impeller seals. Very fortunately, Dean Mason of Hall and Hall (UK) was able to assist with providing a new unused water pump housing (in the event this was the problem) plus a set of the new seals. When they arrived in Australia I commenced disassembly in order to rectify whatever was found to be the problem.

The only constraint being that the water pump is not accessible whilst the engine is mounted in the chassis, as it is located hard up against the bulkhead behind the drivers seat. So to gain access requires disassembly of a bunch of components (including water and oil lines, exhaust system, fuel lines ect) in order to then seperate the engine / suspension assembly from the monocoque. As various components weave through the steel BRM engine mounting frame it is not a simple a procedure separating the BRM motor compared to separating a DFV motor from a monocoque in say a Surtees F1 car or such like.

The three photos below illustrate the telltale evidence of a minor leak of coolant (white streaks) which was not bad enough to drip down when the car was stationary however only occurred when the engine was running and high revving when driven, with a vary fine and limited spray onto the back of the fire bulkhead behind the drivers seat back.


And yes there it is (photo below) the water pump securely tucked in tightly behind the chassis monocoque


On a good note, there was no evidence of any major water leak when viewed from below. 


In order to access the water pump a few miscellaneous components were removed. I then made a timber (with steel pads) frame to mount on a trolly jack that provided level support for the engine and gearbox / suspension assembly in order to roll this back away from the monocoque. 


This then gave access to the water pump assembly. 


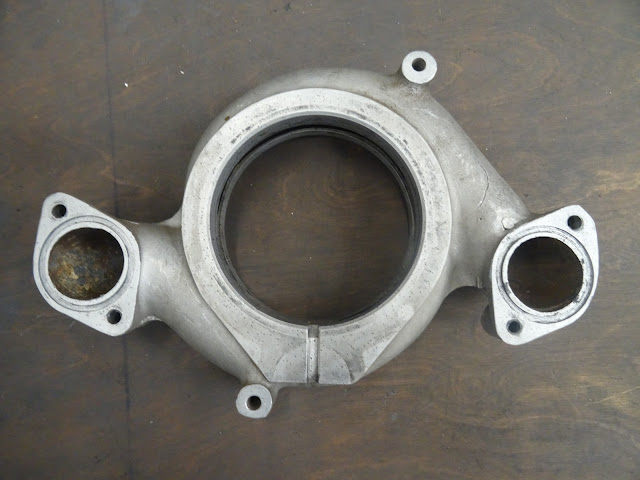
 On detailed inspection, by eye and under magnification Rodney Gibbs (Engine Builder) suspected that the culprit was the water pump housing where one of the internal mounting surfaces was just sufficiently out or round that when hot it may allow hot pressured water to escape past one of the O ring seals. The porosity of the original water pump casting is also quite severe. 

The new water pump housing obtained from Hall and Hall was fortunately a perfect match and a much higher grade casting than the original.


Original Pump Housing in photos above and below.


New pump housing from Hall and Hall below. I was also not 100% happy with the original impeller mounting spacer which also ran within a water seal and had Crawford Hall (engineering toolmaker) make another spacer to higher tolerances, which he made from a hard marine grade bronze material.


New water pump housing from Hall and Hall in photos above and below.


Reassembly

After cleaning up the coolant stains on the monocoque and using the opportunity to give everything accessible a good spanner check and inspection it was a fairly straight forward exercise of assembly and then rolling back the engine/gearbox assembly to mount with the monocoque and reassemble all the removed components. 

Total time taken was 2 days however I feel that in the day with 2 mechanics familiar with the car they probably could have completed the entire exercise in around 2 to 3 hours. 


Having now run the car the minor leak has disappeared, in truth it may have been a weep through the porosity of the original pump housing or a distortion between the housing and the inner o ring or even from in between the impeller mounting spacer and seal.

One thing I did become aware of was how I had run some cables when restoring the car (after fitting the engine) particularly the electrical lines, in a manner that did not easily facilitate the separation of the engine / gearbox assembly from the monocoque, so I re-routed some electrical cables and connection points during the reassembly to make future disassembly faster.


Tuesday, 21 November 2017

Race Meeting - Sydney Motorsport Park HSRCA event - 10 to 12 Nov 2017

Took the BRM to the HSRCA meeting at Eastern Creek (Sydney Motorsport Park) in early November. Discovered that when pushing hard (somewhat harder than the prior test day session) it understeers a bit from mid corner. 


Turns in well but washes out under load. Attempted some quick fixes after each practice / qualifying and race outing such as raising rear ride height, changing bump settings, changing sway bars and adjusting toe in / out at the front which all made a difference but I have determined that I need to go up by 50 lbs in the rear springs to make a major difference, then put the other settings back to a neutral position and start over again with the incremental adjustments during another test day. There is nothing like actual competition to expose the need for adjustment.  

Took the event a bit gently, 1:35 was fastest lap, used to do a few seconds under that in the Surtees TS9B but that was after a number of years of ownership and regular use. Very happy with the car's performance however and was told by a number of spectators how wonderful the V12 engine sounded.

Some photos above of the car at the meeting. Photos by Seth Reinhardt, Daniel Ferraro and Sam Snape, freelance photographers.

I was called up to the Race Secretary's office on the Sunday and formally advised that I had a problem. The car I was told is very noisy, 101.2 db in fact, the loudest of the meeting (except for a Corvette who's exhaust system fell off coming onto the main straight in the sports car event).
I will need to get it down to 95 db for racing at Phillip Island or future Eastern Creek events 


Thursday, 22 December 2016

Dyno Test Results

We ran the BRM on the brand new, just calibrated Dyno at Superior Automotive Services today. Rodney and Andrew operated the dyno with Bradley assisting with various tuning changes to fuel mixture etc etc. 

BRM V12 Engine 009 achieved 513 HP at 10,500 RPM

It is very very loud, very smooth and the 12 little short stroke 250cc pistons (combined with a very small flywheel) rev up very fast. From 8,000 rpm to 10,500 rpm is the sweet zone.

The power of this particular engine (009) has increased compared to the recorded power of these V12 motors in the early 1970's (around 440 to 450 HP as tested by BRM) when they were being used in F1 events. The reason this particular engine performs so well is primarily due to a couple of factors, including:

  • The cylinder heads are the very rare big valve, 4 valve per cylinder versions. As Rick Hall explained to Rodney and myself, only a few of these big valve heads were made in period. The heads on this car are original. 
  • Porting and polishing of the inlet and exhaust ports on the heads. Rodney and Bradley spent quite a bit of time on the porting as the ports were very rough on the original castings.
  • New valves have formed heads with a cross section that better flows the mix into the head.
  • The head of the new pistons was given a lot of attention in terms of shaping to maximize not only mix flow but to ensure the flame front progresses evenly.
  • Good quality cylinder head springs (perhaps a better quality than was available in period)
  • Time spent on engine setup and alignment of moving parts during the rebuild. A lot of time was spent on this and the engine rotates very smoothly.
  • Extremely accurate boring and alignment of the new cylinder liners.
  • Slightly higher compression - running 12.3 to 1


The new Superior Automotive Services dyno room


Rodney and Bradley (who jointly rebuilt the motor) checking spark plugs in between runs.


A couple of the Dyno Runs below 
The second video is the final run recording 513 HP at 10,500 RPM


The Finished Product

First, a reminder what it was - the photo below is of Niki Lauda driving BRM P160E - Chassis 10 at it's first race at the Monza Grand Prix on 9 September 1973


The car underwent only a a few subtle modifications between this first race at Monza Grand Prix and it's final race at the French Grand Prix on 7 July 1974.

Rick Hall has kindly provided me with test results for the car in it's day (Hall and Hall own a majority of the original engineering drawings and records for BRM). A notable event was the test session that BRM ran at the Paul Ricard circuit from 11th to 14th December 1973 with three cars, Chassis 160-10 (my car) plus cars 160-09 and 160-05. They still had Marlboro funding at this point.

The BRM records (formal correspondence to Mr Louis T. Stanley of B.R.M. Ltd) state the drivers for this test session being team drivers Beltoise and Lauda, plus Pescarolo and Migault, the latter two drivers requiring cover insurance. Each car was separately tested by different drivers.

The correspondence records that Chassis 160-10 was tested at Paul Ricard for:
  • new engine oil system (oil tank moved from under wing to RH side)
  • new rear wing 
  • new rear uprights
  • new airbox
  • gear ratios to pull 11,000 rpm
  • metering unit and throttle response (new engine)
When this car (as well as all other remaining B.R.M. owned racecars, records, drawings, spares and various engines) was sold at 'The BRM Collection' auction at Earls Court by Christie's Auctioneers on Thursday 22 October 1981, the P160 Chassis 10 was one of very few 'going' cars. It was painted in it's Marlboro livery and was complete and all assembled. It was in this condition and equipped with the minor tweaks listed above when the Donington Museum purchased it at the auction. And there it sat on display until I was lucky enough to purchased it from the Museum in early 2015. 


Restored

A few photos for posterity.
I have wherever possible sought to retain the patina, no parts have been re-dichromated, the main body and side pods, airbox etc are the original paint, it looks a bit worn and that was the intention. The wheels in the photos below are new however, supplied by Hall and Hall and made to the original pattern and drawings.


Thanks

A number of very skilled people have worked on this car and in particular I would like to thank:

Rodney, Bradley and Andrew of Superior Automotive Services (engine), Rick Hall and Dean Mason of Hall and Hall (parts parts and more parts), Garry Simkin (gearbox), Crawford Hall (fine engineering machinist who worked on so many components), Elwyn Bickley (suspension components), Mike Trueman (rear wing), Rick Kemp (shocks) and Michael Stillone (painting).

There were also many suppliers who often went out of their way to assist, including EARLS (Jack), David Mawer (Mawer Engineering), Stephen Hooker (MT&C Engineers - crack testing), Bryan Miller (Eastern Race Parts) and Swift Electroplating to name a few. 

I will admit to putting in well over a thousand hours over the past 18 months. 


Future Posts

I will do perhaps one or two more posts in the coming months, some footage of the car at a race meeting perhaps.

Many thanks for those of you who have followed this restoration and there are several hundred regular viewers of this blog, from a range of countries including Australia, Spain, NZ, USA, UK, Netherlands, Italy, Czech Republic and Russia to name a few. Thank you for being part of the journey. 

I was very lucky to have been in the right place at the right time to acquire such a lovely beast and one that had not been 'got at' and over restored (to my way of thinking) which is so often the case, and it having genuine originality and a bulletproof provenance. Once patina has gone it cannot be replaced. 

I view myself as merely a custodian of this car for a period of time (hopefully many years to come) and I hope that examples of beautiful early 1970's Formula 1 cars (the era I think represents the most exciting and wildly creative period of F1 development) such as this BRM P160E -10 are regularly used either competitively or on demonstration or at least put on display for racing enthusiasts to enjoy for many many years to come.

Some cars with certain tobacco livery (such as mine having the Marlboro name plastered all over it) are restricted from competing at some events, such as support races to the modern F1 events for example, however thankfully there are still historic race events in Australia and in Europe / USA where there is an appreciation of originality and my car may compete. 
I hope you come to some of them.   

Thanks

John Gale


Tuesday, 13 December 2016

Dyno Run Update

So there has been a small setback but all fixed now. Unfortunately however the Superior Automotive Services Dyno is now undergoing a very very major upgrade so it will be another week or so before we can do proper power runs.

When we first started the car and had it running it soon became obvious that there were 5 cylinders of the 12 that were not running properly as the exhaust pipes for these cylinders were not heating up to the same temperature as the other 7 and the engine was not as smooth and crisp as expected.

There was a bit of frantic checking along the lines of:
  • change the spark plugs - made no difference
  • ran it for a bit thinking some injectors were sticking - made no difference
  • check the firing order - yes correct
  • check the sequence of fuel lines from the metering unit were correct - yes correct
  • Have a break for lunch
  • check the injectors - although refurbished, a couple did dribble so they were lapped but they were not on the cylinders not running correctly
  • decided it must be the metering unit, although this was checked and was felt to be in fantastic condition so it was removed and was sent back to be rechecked - reassembled and remounted but not difference
  • much pondering and gnashing of teeth by Rodney 

At this point I was overseas for work and Rodney started doing some testing in earnest. What he discovered when running the metering unit on the test rig (but with the fittings and lines as used on the car not the test rig fittings) is illustrated in the photo below.

This photo only shows the results of 8 of the 12 cylinders but it can be seen that after running the metering unit at the equivalent of 3000 rpm for 50 seconds some cylinders were being fed twice the amount of fuel as others. It was these high fuel cylinders that were not running correctly. 


What Rodney eventually discovered was that some of the new sealing rings on the banjo bolts (delivery valves) were not seating correctly despite being new. It almost appeared there were some different size o rings in the pack (metric??). This allowed fuel to sneak past and bypass the fitting in order to leak through to the injector lines. As the fuel pressure in the metering unit is at a constant 120 psi it does not take much of a poor fit for the fuel to bypass the seals.


After correcting these and rerunning the simulation we now have equal fuel mix on all cylinders (see photo below). 


The engine was subsequently restarted when I was away and ran well and evenly I am told.
Now just need to cool my heels for a week until the new dyno rig is finished and the engine can be properly tested with some power runs.